
 The story today tells of the events of Palm Sunday. After the story, you’ll find a craft activity – making a Donkey Piñata
The King Is Coming!
By Linda Sue Pochodzay Edwards
The dusty roads leading into Jerusalem were anything but quiet. A buzz of excitement filled the air as preparations for Passover, the biggest holiday of the year, were being made. It seemed that everyone from everywhere was trying to get to Jerusalem to celebrate. But it wasn’t only people . . .
The roads were crowded with donkeys and camels which was the common form of transportation, and not only that, most people also brought other animals with them. The bleating of sheep, the mooing of cows and the cooing of doves could all be heard, as well as the laughing and singing of children. The mood was boisterous and joyous as people greeted old friends and family members they hadn’t seen since the previous year.
“Hey! There’s Uncle Ezra and Aunt Mary.” Joshua excitedly exclaimed to his father. “Is it all right if I go the rest of the way with them?” he asked.
“If it’s okay with them, I don’t mind,” his father replied. “Just make sure to hold onto that goat! If that goat gets away, there will be no feast for you, young man,” his father teased as he tousled Joshua’s hair.
Holding onto that goat was no small feat for Joshua. It seemed that the animal was always wanting to go in the wrong direction, and when it did go the right way it was only because it was trying to get into another person’s feed sacks. Joshua tugged and pulled, and with much struggle, finally caught up to his Uncle Ezra, Aunt Mary, and their children.
“That goat of yours is giving you a difficult time, is it?” Uncle Ezra questioned with a grin. Joshua gave the rope another tug and nodded. “Well, we will be there shortly,” Uncle Ezra said. “I’ll take the goat off your hands for a little while. You and Samuel haven’t seen each other in so long; you have a lot of catching up to do. Go, run and play, but . . . remember to stay close. Don’t go wandering off where we can’t see you.”
Joshua and his cousin Samuel pulled a couple of figs out of their sacks and dashed to the edge of the road to sit under a tree to have their snack. They chattered almost non-stop about the Passover. “No school for eight whole days!” Joshua said excitedly. “Just think of the fun we can have!”
Samuel was more excited about the celebration meals. “There’s going to be so much food!” he exclaimed. “Not only are we out of school for eight days, but we also get to eat for eight days!” The boys were so caught up in their excitement, they forgot that the crowd was moving along, passing them by. Uncle Ezra and Aunt Mary were nowhere to be seen. Jumping up quickly, they hurriedly squeezed their way through the crowd trying to catch up, hoping that they hadn’t been missed.
As the boys were trying to catch up to Samuel’s parents, they passed a small building that had a mother donkey and her young colt tied to a post. “Aw, look at the little colt,” Samuel said gently, as he reached out and tried to pet it.
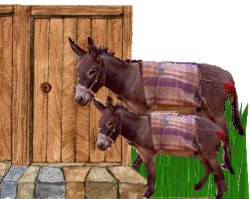 “Yee Haw!” the mother donkey screeched, unhappy that someone was trying to touch her baby. Samuel quickly pulled his hand back and put it in his pocket.
As the two boys stood there admiring the little colt, two men, who were Jesus’ disciples, came along and started to untie the donkey and the colt. “Yee Haw!” the donkey screeched again. Hearing the commotion, the owner came out of the building.
“What are you doing?” he questioned. “Why are you loosing the animals?”
The two disciples, having had a previous discussion with Jesus, were ready for this question and knew just what to say. “The Lord needs these animals,” was the simple reply they gave the owner.
The owner didn’t question further. He let the two men take the animals.
Now, that made Samuel and Joshua curious. They wanted to know who the “Lord” was and why he needed the donkey and the little colt. They followed closely and quietly behind the two men.
Just outside the town, they watched as the men took off their overcoats and laid them on the little colt. Samuel and Joshua were quite surprised that the little colt wasn’t fearful at all, and this time even the mother donkey didn’t seem to mind that someone was touching her baby. They watched as a man got up on the colt and started riding it into town.
“How can he do that?” they heard someone from the crowd ask. “How can he get on and ride a little colt that has never been trained?”
Most of the people in the crowd recognized the man who was riding the little colt. They had heard his teachings, and many had seen at least one miracle. “It’s Jesus! It’s Jesus!” they loudly proclaimed. Many of them took the garments they had brought with them for the week of celebration and laid them on the ground. Other people had brought palm branches on their trip to fan themselves, and they laid those on the ground. Some of them used their palm branch fans to wave in the air, causing a breeze to keep Jesus cool and comfortable.
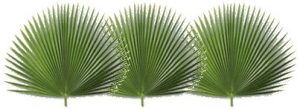
Even the children joined in! Samuel, Joshua, and some of the other young people climbed nearby trees to get more palm branches to lay on the ground. They made a long carpet out of clothing and palm branches, reaching all the way down the road and into town for the donkey and the colt carrying Jesus to walk on. All the while they were laying garments and palm branches on the ground, they were waving and shouting, “HOSANNA! HOSANNA! Blessed be the King that comes in the name of the Lord! BLESSED BE THE KING! HOSANNA!”
The people in the crowd had recognized that day that JESUS is the KING of all the earth. They recognized Him as their Messiah who would one day rule over everything. But there were a few people that were not happy about all this. Some of the Pharisees (teachers in the temple) told Jesus to tell the people to stop shouting and to stop calling Him king, and to stop worshipping Him. Jesus responded to the Pharisees saying: “If these people were to be quiet and not worship Me as their King, then the rocks would cry out in worship.” Jesus and the donkey, and the colt continued on their way into the city of Jerusalem, as the shouts of the people continued. “HOSANNA! HOSANNA! Blessed be the King that comes in the name of the Lord! BLESSED BE THE KING! HOSANNA!”
Joshua and Samuel were excited and had certainly never seen anything like that before, but they were beginning to get nervous and worried. They were afraid they were going to be scolded for not staying nearby. When they finally reached Samuel’s parents, they timidly tried to explain. “Please don’t be angry. There was such a huge crowd of people, and there was so much happening, we couldn’t help it. We got lost in the crowd.”
They were pleasantly surprised when they were told that Uncle Ezra, Aunt Mary, and the other children had also been slowed down by the great crowd of people who gathered around Jesus, and they had kept their eyes on the boys the whole time. They all agreed that it was a wonderful way to begin the great Passover week celebration.
THINK!
1. Why were so many people going to Jerusalem?
2. How many days did they celebrate Passover?
3. Who untied the donkey and the colt?
4. What did the people spread on the road?
5. What did the people shout?
6. What was Jesus’ reply when the Pharisees told Him to make the people stop worshipping Him?
7. In what ways can we worship Jesus?
LET’S PRAY:
Dear God, thank You for giving us times of joy and celebration.
Help us to remember that Jesus is the King over all things and we need to praise and worship Him.
In Jesus’ Name. Amen.
CAN YOU FIND THIS STORY IN THE BIBLE?
- Matthew 21:1-11
- Mark 11:1-10
- Luke 19:29-40
- John 12:12-14
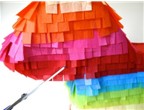
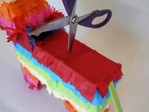
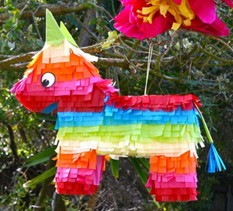
Today’s Craft: How to Make a Donkey Piñata
– Jessica Begum
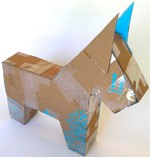
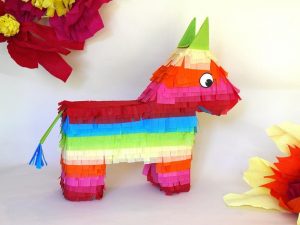 A rainbow donkey or burro piñata is a traditional element found at Cinco de Mayo celebrations, Fill it with treats and try to break it open. Fashioned out of recycled cardboard boxes and colourful tissue paper, it is sure to add festive colour and fun wherever you hang it.
Things You’ll Need:
• Colourful tissue paper
• -20-inch cardboard box (or similar-sized cardboard pieces)
• Ruler
• Clear tape
• Clear packing tape
• Utility scissors or utility knife
• Paper cutter (optional)
• Craft scissors
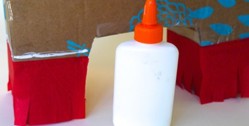
• White glue or hot glue gun
• White paper and marker
• White paper and marker
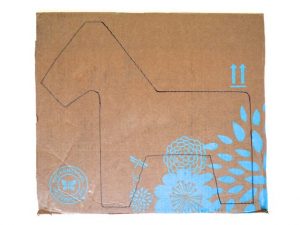
| Step 1: Draw a Donkey Shape onto the Cardboard
For this step, you will need two pieces of cardboard measuring 15 by 18 inches. Draw an outline of a donkey onto one of the cardboard pieces with a pencil as above. If you want to use the templates below |
 |
| Step 2: Cut Out Donkey Shapes & Cardboard Strips Cut out the donkey shape. Trace the donkey onto another piece of cardboard and cut out so that you have two identical donkey shapes. Then, cut out 3-inch wide strips down the length of the cardboard, cutting strips until you have a total length of 65 inches when they are all joined together (three or four strips should be plenty). Next, cut two cardboard triangles roughly measuring 2 by 3 inches.Tip: A paper cutter helps when cutting the strips, but a ruler and cutting knife or utility scissors will work if unavailable. Also, the grain of the cardboard should run horizontal to the width of the strips. This will make folding them easier. |
 |
| Step 3: Tape the Strips Together forming one long length. | 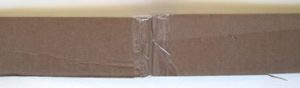 |
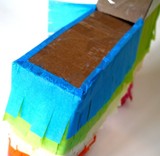
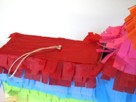
| Step 4: Attach the Strip Between the Donkey Cutouts Attach the cardboard strip between the donkey cutoutsMake the form of the donkey by attaching the long cardboard strip in the middle of the two donkey cutouts. Beginning on the upper back, tape the cardboard strip between the donkey’s shoulders with clear packing tape. Fold the strip down the back, and tape it to the cutouts. |
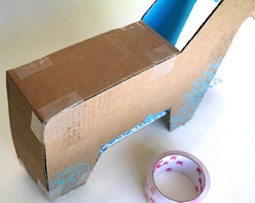 |
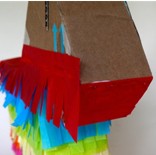
| Step 5: Continue the Strip Around the Donkey Continue folding the cardboard strip around the donkey cutouts, folding at the corners and securing it with tape. When you reach the spot where you started, trim the excess. Glue the ears in place on the sides of the donkey’s head with white glue or hot glue.Tip: If you plan on filling your donkey with candy, leave the last 3 inches open. Don’t overlap the beginning and end of the cardboard strip. |
 |
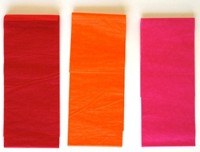
| Step 6: Cut Out Strips of Tissue Paper Next, trim the tissue paper into 3-inch-wide strips. Fold the sheets of tissue in half and cut down the length. You don’t need to cut all of the tissue into strips; start with three strips of each color. You can always cut more if needed. |
 |
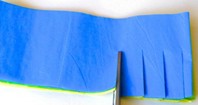
| Step 7: Fringe the Edge of the Strips Fold the strips in half again and stack three or four strips on top of one another. Using craft scissors, cut slits down the length of the strips, stopping about halfway in the middle of the strips to create fringe. Each piece of fringe should be about 1/2 inch wide. |
 |
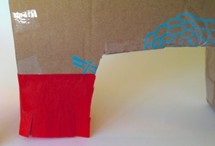
| Step 8: Attach Fringe to the Feet Begin at the bottom of the donkey and wrap a single fringed strip all the way around one of the feet so the edge of the fringe touches the work surface. Secure with a line of white glue under the top of the strip. Do this on the other foot. |
 |
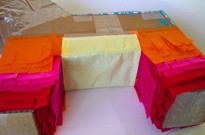
| Step 9: Attach Fringe to the Legs Run a line of white glue just above the first strip, and place another strip of the same color. Continue up the legs, securing three rows of strips before changing colors. |
 |
| Step 10: Cover the Underbelly with Tissue When you reach the point where the bottom of the fringe is flush with the bottom of the donkey’s belly, stop and cover the belly with a couple layers of tissue paper in a new color. Glue it in place. |
 |
| Step 11: Attach Fringe to the Midsection & Back Continue gluing fringe strips around the middle of the donkey, alternating colors every three strips, until you reach the donkey’s back. Fold the next fringe strip over the top edge of the back about 1/4 inch and glue in place. Add the same color fringe around the neck. Continue working up, folding the fringe strips over the top of the back as needed. When the fringe is completed, cover the back with a solid color of tissue paper. Simply cut a 3-inch strip of tissue paper, fold it into thirds so that it is three layers thick, and glue it into place.Tip: If you left a 3-inch space open to fill the donkey with treats, then very lightly tape fringe over the opening so you can easily peel it back later. |
 |
| Step 12: Cover the Chin & Mouth With Tissue When the bottom of the fringe is flush with the bottom of the chin, stop and cover the mouth and chin with a couple layers of tissue paper.Note: Don’t worry about the fringe strips obscuring the shape of the neck and jaw, as you will cut away the excess fringe later. |
 |
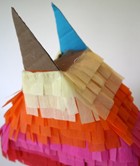
| Step 13: Attach Fringe to the Head Continue working up the head until you reach the top. At this point, trim 1/4 inch off the top of the next fringe strip and attach it around the head directly on top of the previous layer (here, it’s yellow on top of orange). Trim 1/2 inch off the top of the next strip, and then trim 3/4 inch off the next strip. |
 |
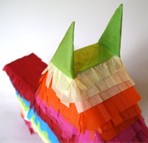
| Step 14: Cover the Head & Ears With Tissue Cover the top of the head with a couple of layers of tissue. Then, double-wrap the ears with the same color of tissue. Trim any excess tissue and glue down. |
 |
| Step 15: Trim the Excess Fringe Under the Jaw Next, trim the excess fringe just under the jaw until the shapes of the donkey’s jaw and neck are clearly seen. |
 |
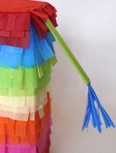
| Step 16: Make a Tail Make a tail by folding up a single sheet of tissue until it is about 1/2 inch wide. Wrap another colored sheet of tissue around it, leaving about 2 inches of the bottom color exposed. Trim the tail to 7 inches total. Fringe the bottom color with scissors. |
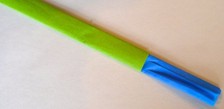 |
| Step 17: Attach the Tail Attach the tail just under the first layer of fringe on the rear end of the donkey. Hot glue works best, but white glue will work, too. |
 |
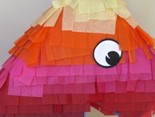
| Step 18: Make & Attach Eye Cutouts Finally, attach an eye on both sides of the head with white glue. You can draw them onto white paper and cut them out. |
 |
Items Needed for Filling & Hanging the Piñata
You can leave the donkey as-is for decorative purposes, or you can fill it with treats.
You’ll need:
- 2-inch washer with a 1/4-inch hole
- Sturdy cord, about 8 inches long
- * Utility scissors
| Step 1: Make a Fill Hole Use scissors or a utility knife to make a 3-inch opening in the piñata where the neck meets the back, and fold the cardboard strip back. If you left this area open when you made the form, you’ll just have to carefully trim the tissue with a utility knife. If it is taped shut, use scissors or a utility knife to release the tape. |
 |
| Step 2: Poke a Hole for the Hanger Poke a hole on the back of the donkey with utility scissors.Use the tip of the scissors to poke a small hole in the donkey’s back. The hole should be centered on the back. |
 |
| Step 3: Attach the Cord to the Washer Fold the cord in half and tie the ends into a thick knot, leaving about a 1-inch tail. Thread the top of the cord through the center of the washer so that the washer stops at the knot. Make your knot big enough so the cord won’t slip through the washer. |
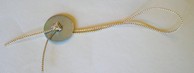 |
| Step 4: Secure the Cord to the Piñata Entering through the fill hole, thread the top of the cord through the hole in the middle of the back, and pull it through. The washer should be inside the piñata. Pull the cord until it’s taut, and tie a thick knot at the donkey’s back so the cord doesn’t slip. |
 |
| Step 5: Fill the Pinata With Treats At this point you can fill the donkey with candy, bouncy balls, stickers, small party favors and confetti. Keep the weather in mind and do not fill with chocolate on a hot day. Then lightly tape the hole closed and re-tape the fringe as necessary. |
Tip: If your donkey is unbalanced when you hold it by the cord, you can weigh the piñata by placing heavier candy and toys in the back, and lighter stickers and confetti in the front. |
| Step 6: Hang the Pinata Hang the piñata on a sturdy tree branch. If you plan to allow children to break the piñata open, hang it low enough so the kids can reach it with a stick. Don’t forget to blindfold them, spin them around and get out of the way. |
 |
HAVE FUN!!!
It would be great to see what you have been making, please share pictures and descriptions of the family times doing the crafts.